Phase C documented, spring spotted, a buy at the low, the stop one tick below it. Then comes the second push down: two ticks below the spring low, your stop is gone, minus one R. And while you are still staring at the fill, the market turns and runs exactly the move you expected. Just without you.
Every trader knows the two voices that speak in this moment. One says: straight back in, this is my trade, the market owes me something. The other says: never again, they hunt my stops, the game is rigged. Both voices cost money — and both argue from the same error: that the stop-out said something about you.
It did not. It said something about liquidity. What the second push was has its own name in Wyckoff's vocabulary; why your stop had to sit exactly where it was taken is in Book I; and for the way back into the market there is no hunch, but three numbered doors. This tool lets you live through the painful moment once more — and then builds, handle by handle, the protocol that turns the second attempt into a trade of its own, one you can justify.
Why this instrument
Chapter 9 lays the foundation, and it is uncomfortable: stop hunting is not a conspiracy but an economic necessity. Whoever wants to buy a large position needs sellers — and the most reliable source of sellers is the predictably placed stops below the last significant low. The price is pushed just under it, the stops are triggered, the liquidity that appears is bought up, then the price runs in the intended direction. The book sums it up in one sentence that flips the direction of your gaze: "You are not stopped out because the market is against you. You are stopped out because your stop sits exactly where someone needs liquidity."
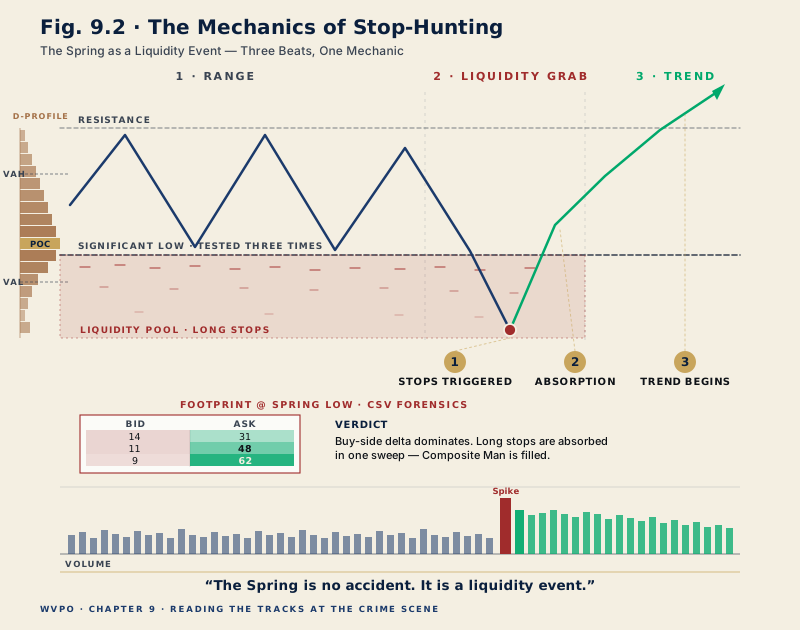
The second half of the foundation is in Book II, chapter 20.7, among the spring traps. Trap 2 is the double spring: a first undercut that looks like a spring, then a second, lower low. Whoever bought the first low is stopped out at the second. The chapter's diagnosis is sober: the stop below the first low was placed correctly; the mistake was entering before the test. The first low came with supply, at a multiple of the usual volume, and a shakeout with supply is not bought at the low; it calls for the test. The second low came without supply; that is where setup 1a was allowed to buy, and setup 1b after the structure break. So the second push is not a failure of phase C. It carries Wyckoff vocabulary: a test of the spring that anchors the accumulation deeper before the markup begins.
That describes the situation after the stop-out precisely: your stop was rule-compliant, your entry came one test too early, and your thesis can still be right. It is exactly in this situation that the two expensive reflexes are born. The revenge order wants to win the loss back and re-enters with no location, no trigger, no risk-reward math; statistically it is the most expensive trade of the day, because it comes from pain rather than structure. Paralysis, on the other hand, declares the market unplayable and lets the doors pass by that open one after another after a genuine test of the spring — even though behind each stands a documented setup with its own edge line. That is why this tool belongs to the psychology pillar, yet it argues throughout with method: the antidote to both reflexes is not a character trait but a protocol — first diagnosis, then door, then budget.
On the data basis, openly stated: all price sequences in this tool are model constructions built on the canon thresholds from chapters 20 and 21, marked ◐ MODEL — our case library holds no fact-checked real-data double spring yet, and we would rather show a clean model than a bent real scene. The rules, stop conventions, RRR minimums and edge figures, by contrast, come unchanged from the WVPO knowledge base, the vetted rule set behind book, academy and app. Nothing here is a signal. It is a training room for the ten minutes after the stop hit.
The tool
Drag the scrubber until your stop falls — and stay in the feeling for a moment. That is exactly where the protocol begins.
◐ MODEL · ES teaching sequence built on the canon thresholds of ch. 20 and 21 (D62/D64) · rules ● SSOT
Drag the scrubber. Your trade: setup 1a at the first low, limit 5,301.00, stop 5,299.75, one tick below the spring low. Watch the volume of the spring candle.
First trade: 5,301.00 → 5,322.25
Tap the marked stop-out candle or open the autopsy via the button.
All prices are a teaching model (◐); rules and edge figures come from the knowledge base (●). No signal, no forecast.
The guided tour — seven handles, one protocol
The order is deliberate: first live through the stop-out and understand it, then settle the stop question, then get to know the doors — and finally decide under pressure. Take two or three minutes for each section.
1 · The stop-out in real time — the moment it is all about
What: Mode 1 plays the model session bar by bar. Your trade is already set: setup 1a at the first low, a limit at 5,301, a stop at 5,299.75, one tick below the spring low of 5,300, as chapter 20 demands. The spring candle came with almost four times the phase B volume. The market turns up, the position is in profit. Then comes bar 24: a second push to 5,299.50, two ticks below the first low. The replay halts automatically, the fill is in: stopped out, minus one R, 1.25 points. After that the market runs on without you, over the POC, over the VAH, into the projection.
Why: There is a reason to live through this moment in the model rather than merely read about it. In hindsight the diagnosis from chapter 20.7 is quickly made: stop right, entry too early. In the moment of the stop hit it feels entirely different. The distance between those two states is exactly the gap in which revenge trades are born. Whoever has run the moment in the replay recognizes it live again, and recognition is the first step before any protocol.
Exercise: Run sequence A to the automatic halt and read the message in full. Note two sentences: the stop was rule-compliant. The entry came before the test.
2 · The autopsy — diagnosis before order
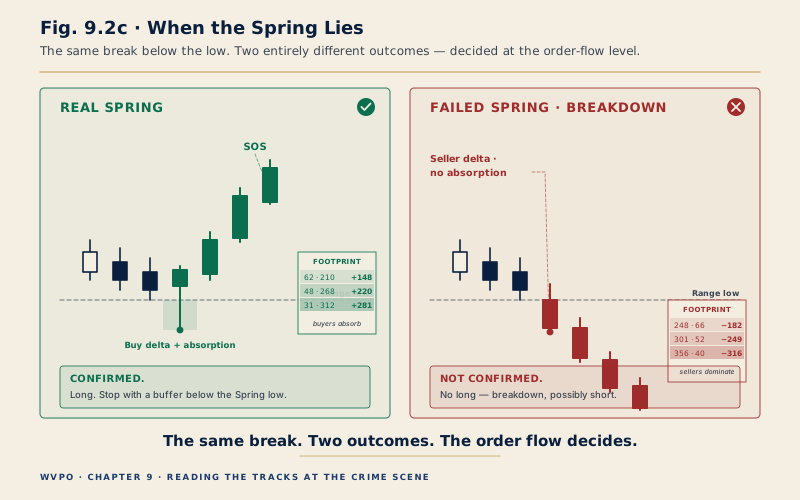
What: At the stop hit you open the autopsy of the stop-out candle, by key or directly on the marked candle. The evidence file checks four things: did the M5 close reclaim the broken low? Did the test come with or without supply? How deep did it run below low 1? And what about your entry? In sequence A the finding reads: close 5,306.50, back above low 1 and above the lower range edge, volume at 0.84 times the average, so without supply, two ticks of test depth. Diagnosis: thesis alive. The fourth row says what chapter 20.7 says: spring 1 came at 3.84 times, so with supply, and should not have been bought at the low. Then you switch to sequence B. Same stop hit, but the flush comes with supply, the close stays below the low, and the following bars accept beneath it. Diagnosis: thesis dead.
Why: This is the most important junction of the entire protocol, and it comes before any order. Chapter 9 states the invalidation rule for the failed spring: long only after a return above the broken low plus buy delta — if the price stays below it, the long thesis is dead, no averaging in, no adding. So a stop-out is not simply a stop-out: one is a test of the spring in an intact accumulation, the other the start of a genuine breakdown. From the outside, in the second of the stop hit, both look identical. The difference stands one candle later in the close — and whoever does not wait for it is trading a coin flip.
Exercise: Open the autopsy in both sequences back to back. Write the diagnostic criterion into your journal, verbatim and as a question: did the M5 close reclaim the broken level? That single question replaces the impulse.
3 · The stop lab — who the test catches
What: Mode 2 poses the question every stopped-out trader asks: would a different stop have survived? You choose the stop, the rule from chapter 20 with one tick below low 1 at 5,299.75, or a buffer, a full point below the low at 5,299.00. Plus the execution basis, a hard stop or only the M5 close, and the test depth, shallow with two ticks or deep with six. The lab plays through every combination. The shallow test takes out the hard stop by the rule and lets the buffer live; the deep test breaks the buffer too; the close basis survives both, because the close comes back.
Why: The answer is yes: with a buffer or the close basis you would have survived. Chapter 20.7 still draws the other conclusion, and the lab shows why. The buffer costs risk, 2.00 instead of 1.25 points, and the RRR to the POC drops from 23.2 to 14.5. The close basis saves you only as long as the close actually comes back; in sequence B you would then sit fully in a falling market. Since the correction of chapter 20 (D62) the rule is unambiguous: the 1a stop sits one tick below the spring low as a hard stop, and a close below it ends the trade anyway. The fix lies not in the stop but in the entry. The volume rule of threshold box 20.5 would have prevented the buy at the first low: a spring without supply may be bought at the low, a shakeout with supply calls for the test.
Exercise: Find the combination that survives the shallow test and still exits in sequence B. It does not exist in pure form. Then write down the sentence the lab proves: a wider stop would have saved this trade and made the next false break expensive; the rule sits in the entry.
4 · The three doors — the market opens more than once
What: Mode 3 shows the full sequence after your stop-out and lays three layers over it. Door 1, test of the spring: the second low came without supply and is an independent spring candidate; the new 1b run triggers at the close of the structure break at 5,307.50, stop 5,299.25 below low 2, RRR 2.7 to the POC and 4.9 to the VAH. Door 2, LPS: only after the sign of strength, the close at 5,346.50 above the phase B high. Then comes the pullback into the buy zone 5,320 to 5,326 below the POC, low 5,319.75, spring AVWAP at 5,318.55. Volume into the low was 0.67 times the average, so mode A: limit 5,320.50 at the zone, stop 5,317 at the spring AVWAP roller, RRR 2.7 to the POC. Behind it stands the largest sample in the playbook, setup 2 with n = 142 modelled trades, on probation. Door 3, BUEC: the pullback to the former VAH after the breakout, entry 5,349, stop 5,346 at the flip tolerance, RRR 4.3 to the projection.
Why: "The train has left" is an optical illusion. An accumulation that holds opens the structured re-entry more than once — in phase C as a test, in phase D as an LPS, at the edge as a BUEC. That is not a consolation formula but playbook architecture: chapter 20 ends with the bridge to chapter 21, and there the entry after the spring is a setup of its own, with its own trigger and its own edge math. What matters is the direction of your gaze: none of the doors retrieves your old trade. Each is a new trade with a full filter pass, its own stop and its own journal line — the old one is closed, documented, done.
Exercise: Switch on all three doors and compare the three stop anchors: below the second low, at the spring AVWAP roller, at the flip tolerance of the former VAH. Answer, for each door, why its stop sits exactly there. Whoever can justify that is trading doors instead of feelings.
5 · The free re-entry — every order gets its verdict
What: Mode 4 gives you the whole chart. You set the order cursor by tap or key on any bar and any price and place your long order. The tool judges instantly and with reasons: inside a door window at a fitting level the order is protocol-compliant, with entry, stop and RRR against the setup minimum. Below the broken low before the reclaim, the martingale ban applies. In the middle of the move, with no door and no trigger, the verdict is chase — with the honest math for why: the nearest structural stop hangs in thin air, the target is too close, the RRR drops below the minimum. And even when the chase math holds on paper, the verdict stands: a location without evidence is not a setup.
Why: Discipline is treated as a matter of character — here it becomes testable. Revenge and protocol do not differ in the feeling with which the order is placed, but in three measurable things: location, trigger, RRR. Those are exactly what the verdict checks, order by order. The order file beneath collects your attempts and makes visible a pattern that takes months to surface in a live account: where your entries systematically land when no one is watching.
Exercise: Deliberately place three orders — one in the door-2 window around 5,320.50, one in the middle of the second rise around 5,340, one below the low around 5,299 right after the stop hit. Read all three verdicts in full. The third is the most important: it describes the trade the pain wants to place.
6 · The interrogation — revenge vs. paralysis
What: Five sealed cases, each begins with a stop hit and then freezes. At each halt you decide: back in now — and if so, through which door —, wait, or no re-entry, final. The cases are mixed: a double spring with all the doors, a failed spring without a reclaim, a slow grind that sags away without a reclaim, a runner that pulls away without a second test and opens only the LPS door — and a mirror case on the short side, stopped above resistance. Scoring runs on two axes: back too early is a revenge point, a missed open door a paralysis point, the right door at the right time a protocol point.
Why: After the stop-out there is not one error but two — and almost every trader has a favorite side. The revenge type re-enters in cases 2 and 3, where the diagnosis is long dead; the paralysis type lets open doors pass in cases 1 and 4 and calls it caution. Ordinary drills measure only the first kind of error. This interrogation counts both separately, because the therapy differs: against revenge, the diagnosis question helps; against paralysis, the door's edge line.
Exercise: Complete all five cases in one run, with no pause between decisions — the time pressure is part of the exercise. In the mirror case the same mechanic holds upside down: a reclaim there means a return below resistance.
7 · The protocol tally — measured, not felt
What: After the last case the tally stands: protocol points, revenge points, paralysis points, door errors — and your R aggregate across all decisions, held against the protocol reference of plus 7.2 R that a strictly rule-compliant run over the same five cases achieves. Below it, the tally names your bias side and recalls the budget rule from chapter 26.4. The best score stays local on your device.
Why: The second attempt is a trainable skill, and training needs an honest yardstick. The reference is deliberately not an ideal value from perfect foresight but the result of the rules themselves — it includes the cases in which the protocol rightly stays out and scores zero R. Whoever falls short of it did not know too little, but acted too early or too late. That is a repairable diagnosis.
Exercise: Repeat the interrogation a week later and compare just two numbers: the bias side and the R aggregate. If the bias drifts toward the middle, the training is working.
Limits & honesty
The stage is a model. All sequences are deterministic teaching constructions built on the canon thresholds of the book: the spring depth in ATR at the lower range edge, the volume rule for spring and pullback, the spring AVWAP roller and the door choreography of phases C through E. The model measures volume against the phase B average because it knows no clock time; the book measures against the average for the same time of day. A real market delivers the same patterns noisier, slower and with more failed attempts. We will show a fact-checked real-data double spring only once we have one.
The edge figures deserve a second look too: they all come from the model samples and case studies of the book chapters, the LPS line with n = 142 included; in the example sample from Volume I it is on probation. Chapter 17 still holds in full: an edge line is only yours once you have validated it on your own instrument with your own data. The figures here justify the structure of the protocol, not your future hit rate.
The protocol itself has a built-in limit, and it sits deliberately at the end of every tally: the budget. Re-entries count fully toward the losing-streak rule from chapter 26.4 — five losses in a row or three R in a week force the pause, even when a door is open right now. Before that comes Book I, chapter 8.3: after every loss a 20-minute break applies, and only then is a re-entry through one of the three doors possible. A protocol that permits unlimited attempts would only be a more polite form of revenge. And a footnote on the sources, because honesty extends to your own library too: until October 2026, chapter 20.7 left open whether the stop reacts to the wick or to the close, and the tool treated the question as an open decision. The corrected edition (D62) has settled it: a hard stop, one tick below the low. The lab now shows the alternatives only for comparison. What this tool is not stands at the end: no signal, no forecast, no call to any trade. For anything involving real money, the risk notice applies.
Case vocabulary
The three anchor terms of this post, verbatim from the WVPO glossary (translated from the canonical German):
Spring — "Phase-C event: a sharp undershoot of a support with a reclaim (liquidity hunt). Anchor of setup 1a/1b." (Book II, ch. 20)
Test of the Spring — "A second probe below the first spring low after a short markup pause (double-spring sequence): not a phase-C failure but the test that anchors the accumulation deeper before the markup begins. If the first low came with supply, only this test is the buying point; whoever bought the first low is stopped out here (ch. 20.7, D62). At the same time door 1 of the structured re-entry." (Book II, ch. 20)
LPS (Last Point of Support) — "Pullback after the sign of strength: a higher low in the buy zone below the POC (phase D, Vol. I ch. 10; D64). Anchor of setup 2." (Book II, ch. 21)
The case file as audio
Turning Stop Hunts into Professional Re-Entries
Two AI hosts dissect the tool along its book sources.
The printable tool cheat sheet
The six key rules of this tool as a printable page for your trading desk — double opt-in, unsubscribe anytime.